
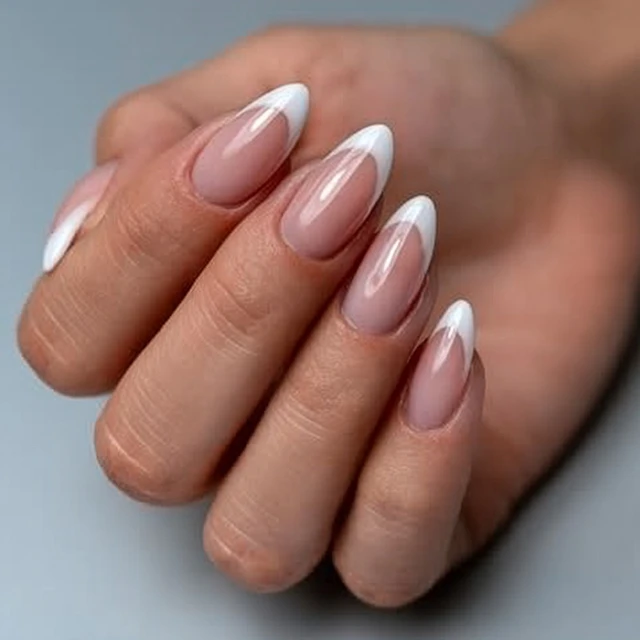
There’s a certain quiet confidence in a nail that doesn’t shout. The 2026 micro French nails capture that perfectly. Instead of a bold white band, you get a whisper-thin line along the free edge. It’s clean, understated, and surprisingly hard to get right. But once you nail the technique, it’s the most elegant look in your rotation.

What Makes Micro French Different
The classic French manicure uses a tip that covers about a quarter to a third of the nail. The micro version shrinks that down to roughly one-eighth of the nail length. That might sound like a small change, but it transforms the entire look. The thin line creates an illusion of longer, more slender nails. It works best on short to medium-length nails with a rounded or soft almond shape. The sheer nude or pink base lets your natural nail show through, so the look feels modern and effortless.
Getting the Exact Ratio Right
Here’s the trick that nail techs use: the tip should be no wider than the thickness of a credit card. I keep the ratio at 1:8 — one part white tip to eight parts nude nail bed. To measure, look at your nail from the side. The white line should just skim the edge, not cover it. If you can see a distinct white stripe from across the table, it’s too thick. The goal is a subtle highlight, not a border.
Step-by-Step Application
Prep Matters More Than Polish
Start with clean, dry nails. Push back cuticles gently with a wooden stick. File the free edge to a smooth curve. Buff the nail surface lightly to remove shine. Wipe with isopropyl alcohol on a lint-free pad. This removes oils and helps polish grip. Skipping this step leads to chipping within a day.
Base and Color
Apply one thin coat of base coat. Let it dry completely. Then apply one coat of sheer nude or pink polish. I prefer a shade that matches the flush of your nail bed. Let that dry too. The sheer layer hides any yellowing or unevenness in the natural nail.
The Micro Tip
This is where precision counts. Use a thin detail brush or a striper brush. Dip the tip into white polish and wipe off excess on the bottle rim. You want just enough color to paint a fine line. Start at the center of the free edge and pull the brush outward to one side, then the other. Keep the brush parallel to the cuticle. The line should be straight and even. If it wobbles, clean the brush with alcohol and try again. Don’t panic if you make a mistake — a small dot of alcohol on a lint-free wipe will erase it instantly.
Common mistake: pressing too hard. The brush should barely touch the nail. Let the polish flow from the brush tip. If the line looks too thick, you’re using too much polish.
Seal It In
Apply one thin coat of top coat. For extra durability, cap the free edge by brushing the top coat over the tip and just under the nail. This prevents chipping. Let it dry thoroughly. Finish with cuticle oil to hydrate and add shine.
Adapting for Gel or Regular Polish
Gel polish gives longer wear. Cure each layer under a UV/LED lamp according to the brand’s instructions. The micro tip technique is the same. Regular polish works well too but needs a good top coat and careful drying. Avoid heavy hand washing for the first hour after application.
Common Mistakes and Fixes
- Tip too thick: Use less polish on the brush. Practice on a piece of paper first.
- Uneven line: Clean the brush and start over. Don’t try to fix a crooked line by adding more polish.
- Chipping within days: You may have skipped the base coat or didn’t cap the free edge. Go back to basics.
- Yellowing base: Use a sheer nude with a slight pink or peach undertone. Avoid stark white bases.
The Takeaway
Micro French nails are about restraint. The thin line requires a steady hand and patience, but the result is worth it. This is a look that works for any occasion — from the office to a weekend camping trip. Once you master the 1:8 ratio and the light brush stroke, you’ll have a go-to manicure that never feels overdone.
Frequently Asked Questions
What is the difference between micro French and classic French nails?
The classic French tip covers about 1/4 to 1/3 of the nail. The micro French tip is much thinner, usually 1/8 of the nail length or less. It creates a subtler, more natural look that elongates the fingers.
Can I do micro French nails at home?
Yes, with patience and the right tools. Use a thin detail brush or striper brush for the tip. Practice on a few nails first. A sheer nude base helps hide mistakes. For best results, work in good light and steady your hand.
How long do micro French nails last?
With proper prep and a quality top coat, a micro French manicure can last 5-7 days for regular polish or 2-3 weeks for gel. Avoid soaking nails in water for long periods and wear gloves when cleaning to extend wear.