
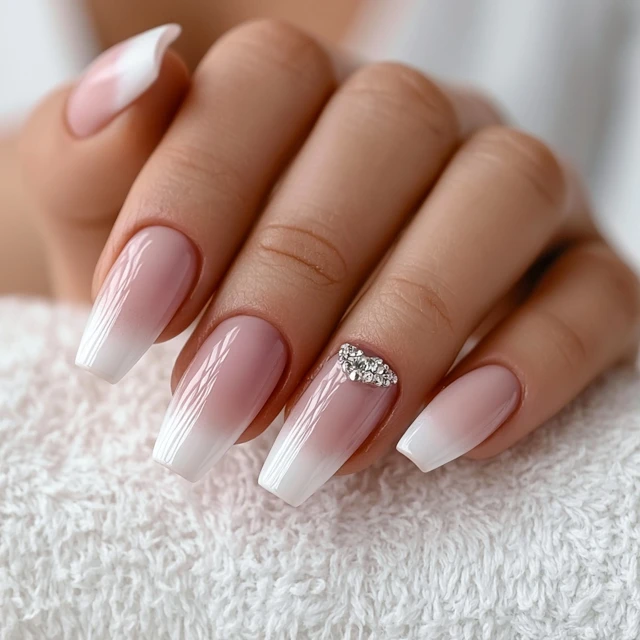
The first time I saw a set of milky white coffin acrylics, I stopped scrolling. The color wasn’t white, not quite. It was more like a whisper of white, a translucent veil that caught the light and scattered it softly. The shape—tapered, squared-off tips—added a modern edge. I knew I had to recreate that exact look. Here’s how to get it right, every time.

Why Milky White Coffin Acrylics Work
The magic is in the balance. Opaque white is stark; it hides everything. Milky white is translucent. It lets your natural nail peek through, creating depth. The coffin shape elongates the fingers, making the set look elegant and strong. Together, they make a statement without shouting.
The Right Ratio for Translucency
I keep the ratio at 2 parts acrylic powder to 1 part liquid, by volume. For the milky white, use a dedicated translucent powder, not a mix of clear and opaque white. That blend often turns cloudy or uneven. A true milky white powder has fine particles that scatter light evenly. If you can’t find one, mix a tiny amount of opaque white into clear powder—start with 1 part white to 10 parts clear. Test on a form first.
Step-by-Step: Building the Set
Start with clean, dry nails. Push back cuticles gently. Buff the natural nail surface lightly—just enough to remove shine. Wipe with dehydrator. This step is non-negotiable. Oils cause lifting. Apply a thin layer of primer and let it air dry for 30 seconds. Do not touch the nail after.
Place nail forms snugly under the free edge. They should curve slightly upward to guide the apex. Mix a small bead of clear acrylic—about the size of a pea. Place it at the cuticle area, then drag it toward the tip in a thin layer. Let it set for 10 seconds. This creates the base and the apex, the curved high point that gives strength.
Now the milky white. Mix a bead slightly larger than the first. Use the same 2:1 ratio. Place it over the clear base, starting at the cuticle and moving to the tip. Use a gentle patting motion—don’t sweep. Sweeping introduces bubbles. Let the bead flow naturally. The translucency will appear as the acrylic cures. If you want a stronger white at the tip, mix a tiny bead of opaque white and apply to the free edge. Blend the edge where the two whites meet with a clean brush dipped in monomer.
Wait two minutes for the acrylic to harden fully. Then remove the forms. File the entire surface with a 180-grit file. Shape the sides straight, then taper toward the tip. The coffin shape has a narrow free edge and a squared-off tip. Check from the side: the apex should be at the center of the nail, highest point. Buff the surface with a fine-grit buffer until it’s glass-smooth. Wipe away dust.
Apply a thin layer of top coat. If using gel, cure for 60 seconds under a UV/LED lamp. Wipe with alcohol. Finish with cuticle oil. The oil seeps into the edges, preventing lifting.
Common Mistakes and Fixes
Most people over-file the apex, making the nail weak. The apex should be about 1/3 of the nail’s thickness. If it’s too flat, the nail will break at the stress point. Another mistake: using too much liquid in the bead. The acrylic runs, creating a bumpy surface. Keep the bead dry enough to hold its shape on the brush. If bubbles appear, you pressed too hard. Next time, pat gently.
Camping Adaptation
If you’re doing nails at a campsite, work in a well-ventilated area—under a canopy or near a breeze. Acrylic fumes are strong. Keep liquids and powders in sealed containers to prevent dust from blowing away. Use a small portable table. For top coat, a quick-dry regular polish works if you don’t have a lamp. Apply thin coats to avoid smudging. Wash hands thoroughly before handling food.
Takeaway
Milky white coffin acrylics are about restraint. Let the translucency do the work. Focus on the shape and the smooth finish. That’s what makes them screenshot-worthy. Practice the ratio and the patting motion, and you’ll have a set that turns heads at the campsite or anywhere else.
Frequently Asked Questions
What is the difference between milky white and opaque white acrylic?
Milky white acrylic is translucent, allowing a hint of natural nail color to show through, creating a soft, ethereal look. Opaque white is solid and covers the nail completely, often used for a stark white or as a base for designs.
How do I avoid bubbles in my acrylic application?
Bubbles often form when the acrylic bead is too wet or when you press too hard. Use a 2:1 powder-to-liquid ratio, let the bead sit for 10 seconds before applying, and use a gentle patting motion rather than sweeping.
Can I achieve this look without a nail form?
Yes, you can use full-coverage tips instead of forms. Apply the acrylic over the tips, but ensure you blend the acrylic at the cuticle for a seamless look. The form method gives more control over the apex and shape.