
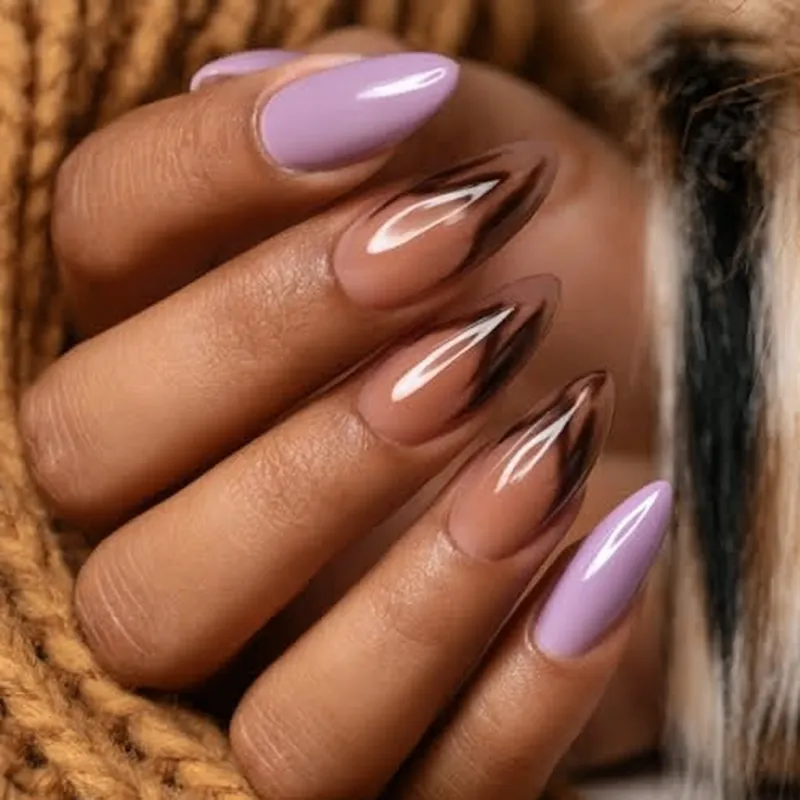
I noticed it first on a friend’s hands over coffee. She held her mug, and the light caught her nails in a way that wasn’t shiny, wasn’t matte—it was soft, almost like brushed velvet. That’s when I knew: 2026 isn’t about loud glitter or complicated stamping. It’s about texture, negative space, and shapes that feel intentional.

This year, the statement comes from restraint. A single diagonal line. A barely-there base. A finish that begs to be touched. Let me walk you through the three defining looks and exactly how to execute them at home.
The Asymmetrical Negative Space Nail
This is the cleanest way to make a statement without color overload. Think of a sheer, milky base—almost like a tinted glass—with one bold, graphic element placed off-center.
Technique and method
Start with a clean, shaped nail. I always use a 180-grit file to create an almond or squoval shape, then gently buff the surface with a 240-grit buffer to remove shine. No cuticle nippers needed—just push back the cuticles with a wooden stick after applying a drop of cuticle remover for two minutes.
Apply a thin layer of base coat and cure it (or let it dry completely if using regular polish). Then, two thin coats of a sheer milky white or blush pink polish. The key here is thin coats—if the polish is too thick, the base looks opaque and you lose that translucent effect. Let each coat dry fully.
For the design: place a small piece of striping tape diagonally across the nail—from the upper left corner of the cuticle to the lower right edge of the free edge. Press it down firmly. Paint over the exposed area with a matte black polish, just one coat. While the black is still wet, carefully peel the tape away. You’ll have a sharp, clean diagonal line with the sheer base peeking through on the other side. Seal with a matte top coat.
Common mistake: pulling the tape too slowly. Rip it off in one quick motion for the crispest edge.
Velvet Texture Nails
If you want people to literally stop and stare at your hands, this is the finish. It looks like finely milled velvet, and the texture catches light differently from every angle.
What you’ll need
You need a gel base and a no-wipe top coat for this one—regular polish won’t hold the powder. Also pick up a fine velvet powder (it should feel like soft flour, not gritty sand).
Step-by-step
- Prep the nails as usual: shape, buff, clean with alcohol.
- Apply a thin layer of base coat and cure under a UV/LED lamp for the recommended time (usually 30-60 seconds).
- Apply two thin layers of your chosen color—a dusty rose or soft taupe works beautifully. Cure each layer.
- Apply a no-wipe top coat and cure for exactly 30 seconds. You want it tacky, not fully hardened.
- While the tacky layer is still there, dip a small eyeshadow applicator into the velvet powder. Gently press the powder onto the nail, covering the entire surface. Don’t rub—just press and lift.
- Tap off the excess powder with a soft brush. Cure for another 60 seconds.
- Seal with a thin layer of top coat and cure. The velvet effect remains, but it’s now protected.
The texture should feel soft to the touch, not rough. If it feels gritty, you used too much pressure when applying the powder. Always work in a well-ventilated area when using gel products, and do a patch test on one nail first if you’re prone to allergies.
Asymmetrical Shapes
Shapes are shifting in 2026. The perfect symmetry of a classic almond or stiletto is giving way to something more organic: one side of the nail slightly longer than the other.
How to file asymmetrically
Start with nails grown out to medium length—at least 3-4 millimeters past the fingertip. Using a 180-grit file, shape the left side of the nail into a gentle curve, then file the right side to be about 1 millimeter shorter and slightly more squared off. The result is a subtle imbalance that feels modern and sculptural.
Important: keep the filing light. You’re not removing a lot of nail. The asymmetry should be barely noticeable at first glance—just enough to catch the eye. Over-filing can weaken the natural nail, so stop every few strokes to check the shape from above.
This shape works best with sheer or matte finishes. A glossy top coat on an asymmetrical nail can look too reflective, drawing attention to the imbalance in a jarring way. Matte softens the look.
A short takeaway
2026 design statement nails are about confidence in simplicity. The asymmetry, the velvet texture, the negative space—they all require a steady hand and patience, but the payoff is a manicure that feels personal and deliberate. Start with one nail as an accent if you’re nervous. Once you see how the light plays off that velvet stripe or that off-center line, you’ll want to do the whole hand.
Frequently Asked Questions
What are the top nail shapes for 2026 design statement nails?
Almond and squoval shapes remain strong, but the standout shape for 2026 is the asymmetrical coffin: one side slightly longer than the other, creating a dynamic silhouette. It works best on medium-length nails and requires careful filing with a 180-grit file to avoid uneven stress points.
How do I create the velvet nail texture at home without a salon?
Start with a base coat and two thin layers of a sheer or milky gel polish, curing each under a UV/LED lamp. Apply a no-wipe top coat and cure it for 30 seconds. While the tacky layer remains, gently press a fine velvet powder (look for a soft, polyester-based one) onto the nail using a small eyeshadow applicator. Tap off the excess and cure for another 60 seconds. Seal with a thin layer of top coat and cure. The trick is not to overbrush—let the powder sit naturally for that plush finish.
Can I wear 2026 statement nail designs on short nails?
Absolutely. The key is scaling the design. Instead of a large asymmetrical stripe, use a thin diagonal line along the cuticle line or a small geometric triangle at the corner. Sheer bases and velvet textures actually look more refined on shorter nails because they don’t overwhelm the nail plate. Just avoid heavy 3D embellishments that can make short nails look stubby.
What is the best base color for 2026 nail trends?
Sheer, milky whites and soft blush pinks are the go-to bases this year. They let the design elements—whether negative space or texture—take center stage. I always apply two very thin coats of a translucent nude polish, letting each dry completely before adding the design. This prevents the base from looking streaky or thick.