
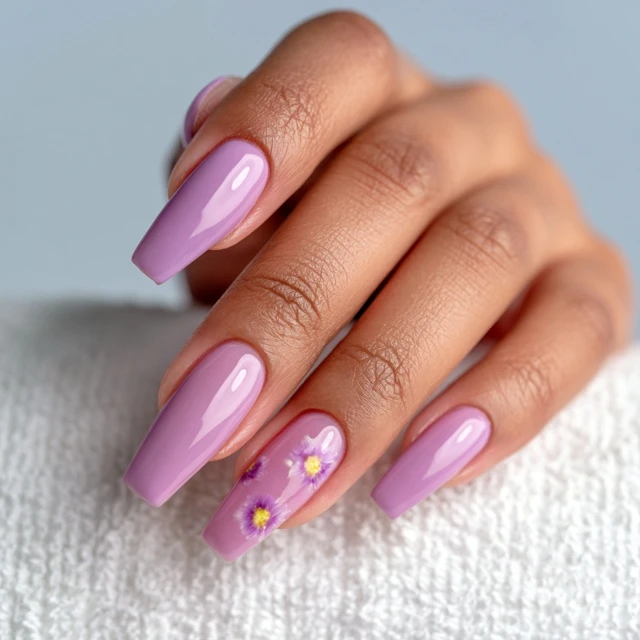
The first time I saw lavender coffin spring nails on someone’s hands, I stopped mid-step. It wasn’t just the color—it was the shape. The coffin silhouette, with its straight sides and flat, tapered tip, catches light differently than an almond or square. And that lavender? It’s not a random pastel. There’s a precise ratio that makes it look like spring on your fingertips, not a washed-out lilac or a muddy purple.

If you’ve been scrolling through nail inspo and wondering how to get that exact look—the one that makes people ask for your nail tech’s number—you’re in the right place. I’m going to walk you through the technique, the exact color mix, and the shaping method that gives you professional results at home or even at a campsite.
The Perfect Lavender Ratio
The biggest mistake I see is using a single lavender polish straight from the bottle. Most commercial lavenders are either too pink (more mauve) or too blue (more periwinkle). For that true spring lavender—the one that looks like fresh lavender buds against a gray sky—you need to mix your own.
Here’s the exact ratio I use: 2 drops opaque white gel, 1 drop blue gel (cobalt or royal blue), and 1 drop purple gel (deep violet). Stir until the color is uniform—no streaks. If you want a cooler lavender (more gray-blue), add half a drop more blue. For a warmer lavender (more pink undertone), add half a drop more purple. Test on a practice nail or a piece of foil before applying.
Why this works: The white gives opacity and brightness, the blue pulls it into the lavender family (not pink), and the purple deepens it without making it dark. The ratio is key—too much white and it looks chalky; too much blue and it reads as periwinkle.
Shaping the Coffin
Coffin nails—also called ballerina nails—require a specific file technique. Start with nails filed to your desired length (I recommend at least medium length for the coffin shape to read properly). Use a 180-grit file. File the tip straight across, like you’re making a square nail. Then, file the sides in a straight line from the cuticle to the tip, tapering slightly inward at the free edge. The sides should be parallel to each other, not pinched too narrow. The tip should be flat, not rounded. A common mistake is filing the sides too thin, which weakens the nail—keep the center thick.
Buff the surface gently to remove shine and create adhesion for polish. Push back cuticles with a cuticle pusher, and brush away all dust. A clean nail bed is non-negotiable for long-lasting wear.
Application Technique for Longevity
Thin coats are your friend. A thick coat of gel will pool at the cuticles and cure unevenly, leading to lifting. Apply a thin base coat, cure per your lamp’s instructions (usually 30-60 seconds). Then apply the first thin coat of your mixed lavender—just enough to cover the nail, not flood the cuticles. Cure. Apply a second thin coat for full opacity. Cure. Finish with a top coat, cure, and wipe off the sticky residue with isopropyl alcohol on a lint-free wipe.
One tip that makes a difference: cap the free edge. With each coat—base, color, and top—run the brush lightly along the tip of the nail. This seals the edge and prevents chipping, especially important for longer coffin nails that take more wear and tear.
Camping Adaptation
If you’re doing nails at a campsite, work in the shade to avoid gel curing from sunlight or heat. Wind can blow dust onto wet polish, so set up in a sheltered spot. Use a small UV lamp that runs on a power bank—many are portable enough for a picnic table. For regular polish, use a quick-dry top coat and allow extra drying time between layers (2-3 minutes). Keep your tools in a sealed bag to keep them clean.
Common Mistakes and Fixes
- Lifting at the cuticle: You applied polish too close to the cuticle. Leave a tiny gap (about 1mm) between polish and skin.
- Uneven color: Your coats are too thick. Apply thinner layers and cure fully between each.
- Chipping: You didn’t cap the free edge, or your top coat isn’t thick enough. Add a second layer of top coat on high-wear nails (index and middle fingers).
- Color too dark: Add a drop more white to your mix. Too light? Add a tiny drop of purple.
Storage and Safety
Mixed gel polish can be stored in a small airtight container (like a glass jar or silicone mixing cup) away from light for up to 2 weeks. Do not refrigerate—temperature changes can affect gel consistency. If using regular polish, store the mixed color in a small bottle and label it. Always work in a well-ventilated area, especially with gel polish, and avoid skin contact with uncured gel (it can cause allergies over time).
Takeaway: The lavender coffin spring nails that everyone’s asking for come down to two things: the exact color ratio (2:1:1 white to blue to purple) and precise shaping. Master those, and you’ll have a salon-quality look that lasts through a weekend of camping or a week of spring errands. No need to book an appointment—you’ve got this.
Frequently Asked Questions
What is the exact ratio for a perfect lavender gel color?
Mix 2 drops opaque white gel, 1 drop blue gel, and 1 drop purple gel. Adjust with half a drop of blue for cooler tones or half a drop of purple for warmer tones.
How do I shape coffin nails without breaking them?
Use a 180-grit file, file straight across the tip, then taper the sides at a 45-degree angle. Avoid filing the sidewalls too thin—keep the center of the nail thicker for strength.
Can I do lavender coffin nails with regular polish instead of gel?
Yes. Use the same color ratio with regular polish, but allow 2-3 minutes drying time between thin coats. Finish with a quick-dry top coat to prevent smudging.