
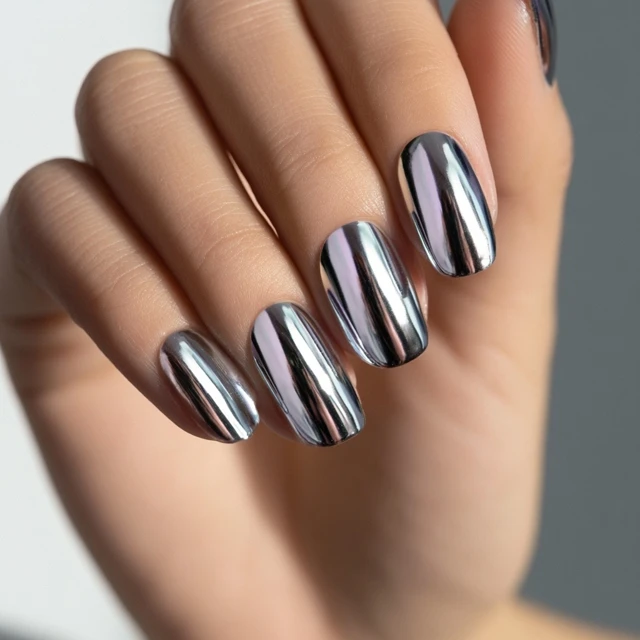
The first time I saw mirror chrome nails on my feed, I stopped scrolling. That liquid-metal finish, catching light from every angle, looked like something from a sci-fi movie. I figured it was a salon-only job—too finicky, too technical for my own hands. Turns out, I was wrong. With the right ratio of product to technique, you can get that same high-shine mirror effect at home. It’s all about the method.

The Non-Negotiable Base
For chrome to look like a mirror, the base must be black. Not dark gray, not navy—black. The chrome powder is translucent; it relies on the dark underlayer to reflect light back through the metallic particles. I use a black gel polish in two thin coats. Thick coats create lumps that ruin the reflection. Cure each coat fully—60 seconds under a 36-watt LED lamp, or 2 minutes under UV. A smooth, flat surface is your foundation.
The Critical Layer: No-Wipe Top Coat
Here’s where most DIY attempts fail. You must use a no-wipe (also called non-tack) gel top coat. A regular top coat leaves a sticky inhibition layer that traps the chrome powder and turns it into a muddy mess. Apply a thin, even layer of no-wipe top coat over the cured black polish. Cure for exactly 30 seconds—no more, no less. Over-curing makes the surface too hard for the powder to bond. Under-curing leaves it tacky. The sweet spot is a semi-cured film that feels dry but still slightly warm.
The Application Technique
As soon as the top coat comes out of the lamp, work fast. Pick up a small amount of chrome powder on a soft eyeshadow applicator or a silicone brush. Rub it onto the nail using firm, circular pressure. You’ll see the mirror appear instantly. Don’t dab or swipe—rub. The friction pushes the particles into the semi-cured layer, aligning them into that reflective surface. If you see a dull spot, pick up fresh powder on a clean applicator and rub again. For full coverage, I use about three passes per nail.
Common Mistake to Avoid
Don’t use your finger to rub the powder. The natural oils on your skin will contaminate the surface and dull the finish. Stick to applicators or brushes. Also, don’t blow on the powder to remove excess—you’ll scatter it everywhere. Gently brush it off with a soft makeup brush.
Sealing the Deal
Once you’re happy with the mirror effect, you need to seal it. Apply a thin layer of regular gel top coat (the kind that leaves a tacky layer). Cure for 60 seconds. Then wipe the tacky layer off with alcohol and a lint-free wipe. This final step protects the chrome from chipping and gives it that glass-like shine. Skip this, and the powder will wear off in a day.
The Takeaway
Mirror chrome nails aren’t about luck—they’re about sequence. Black base, no-wipe top coat, 30-second cure, firm circular rubbing, and a sealed top coat. Follow that order, and you’ll get a finish that stops feeds. The rest is just practice.
Frequently Asked Questions
Why is my chrome powder not sticking?
This is the most common issue. The culprit is usually the top coat layer. You must use a no-wipe gel top coat and cure it for the exact time recommended (usually 30 seconds). Over-curing or using a regular top coat that leaves a tacky layer will prevent the powder from adhering. Also, make sure your black base is fully cured and smooth.
Can I use any color base for chrome nails?
For the classic mirror effect, a black base is non-negotiable. It provides the dark backdrop that makes the chrome powder reflect light like a mirror. You can experiment with dark colors like deep burgundy or navy, but the result will be a colored chrome, not a true mirror finish.
How do I prevent the chrome from looking patchy?
Patchiness happens when the powder isn’t applied evenly or the base is uneven. Use a firm, circular motion with a fresh applicator for each nail. Work quickly after curing the top coat—the powder adheres best to a warm, fresh surface. If you see a patch, reapply a tiny bit of no-wipe top coat to that spot, cure for 10 seconds, and re-rub the powder.